
Can you spray paint lawn furniture? Yes, you absolutely can! Spray painting your old, tired lawn furniture is a fantastic way to give it a new lease on life. It’s a budget-friendly and surprisingly simple DIY project that can transform your outdoor space. Whether you have metal chairs, plastic tables, or wicker loungers, a fresh coat of spray paint can make them look brand new.
This guide will walk you through everything you need to know about spray painting lawn furniture to achieve professional-looking results. We’ll cover the best materials to use, proper preparation techniques, and the application process to ensure your furniture looks great for seasons to come.
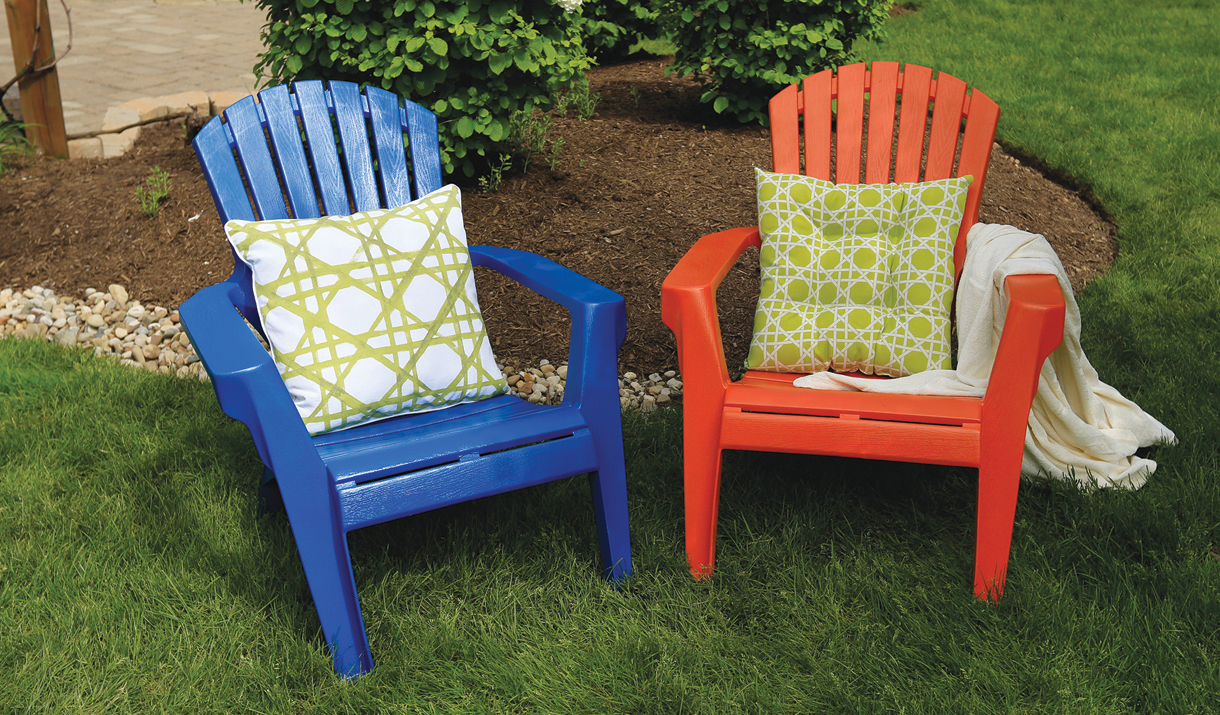
Image Source: www.krylon.com
Choosing the Right Materials
The success of your spray painting project hinges on using the right products. For spray painting outdoor furniture, you need paints and tools designed for durability and exposure to the elements.
The Best Spray Paint for Patio Furniture
When selecting best spray paint for patio furniture, look for products specifically labeled for outdoor use. These paints are formulated to withstand UV rays, moisture, and temperature fluctuations.
- Enamel Paints: These are excellent choices as they provide a hard, durable finish. Many enamel spray paints also offer rust protection, which is crucial for metal furniture.
- Acrylic Enamels: These combine the durability of enamel with the flexibility of acrylics. They are often a good choice for various materials.
- Specialty Paints: You can find spray paints designed for specific materials like plastic or metal. These often have better adhesion and a more appropriate finish for those surfaces.
Brands to Consider:
- Rust-Oleum: A popular and reliable brand for furniture painting. They offer a wide range of colors and finishes, including their Painter’s Touch 2X Ultra Cover line, which provides good coverage and durability. They also have specialized lines for metal.
- Krylon: Another well-regarded brand. Their Colormaster line is known for good coverage and a smooth finish. They also have specific products for plastic furniture.
Other Essential Supplies
Beyond the spray paint, gather these items:
- Drop Cloths or Tarps: To protect the surrounding area from overspray.
- Painter’s Tape: For masking off any areas you don’t want to paint.
- Sandpaper: Various grits (e.g., 120-grit and 220-grit) for preparing surfaces.
- Wire Brush: For removing rust and loose paint from metal.
- Cleaning Supplies: Soap, water, and rags for washing the furniture.
- Degreaser or TSP (Trisodium Phosphate): For thoroughly cleaning greasy or dirty surfaces.
- Primer: Especially important for metal or plastic, or when painting over dark colors with a lighter shade. Choose a primer designed for outdoor use and compatible with your chosen paint.
- Gloves: To protect your hands.
- Mask: To protect yourself from paint fumes.
- Safety Glasses: To protect your eyes from paint splatter.
- Stir Sticks: If you opt for a spray can that requires shaking or mixing.
How to Prep Furniture for Spray Paint: The Crucial First Step
Proper preparation is the most important part of how to prep furniture for spray paint. Skipping these steps will result in a less durable and professional-looking finish.
Step 1: Clean the Furniture Thoroughly
Dirt, grime, pollen, and mildew can all prevent paint from adhering properly.
- Wash: Use a mild soap and water solution. A scrub brush can help remove stubborn dirt. Rinse the furniture completely with clean water.
- Degrease: For furniture that has been exposed to a lot of grease or oil (perhaps from barbecue use), use a degreaser or a TSP solution. Follow the product instructions carefully, as TSP can be caustic. Rinse thoroughly again.
- Dry: Allow the furniture to dry completely. You might need to wait a full day, especially for porous materials or if you can’t place it in direct sunlight.
Step 2: Remove Old Paint and Rust
If your furniture has peeling or flaking paint, it needs to be removed.
Removing Old Paint from Lawn Furniture
- Scraping: Use a putty knife or scraper to remove any loose or bubbling paint.
- Sanding: For tougher paint, use sandpaper. Start with a coarser grit (like 120-grit) to remove the bulk of the old paint, then move to a finer grit (like 220-grit) to smooth the surface.
- Chemical Paint Strippers: For very stubborn paint, you can use a chemical paint stripper. Always follow the manufacturer’s safety instructions, wear gloves and a mask, and work in a well-ventilated area. After applying the stripper, you’ll typically scrape away the dissolved paint and then clean the surface.
Dealing with Rust on Metal Furniture
- Wire Brush: For light rust, a stiff wire brush is usually sufficient. Scrub the rusted areas until you expose clean metal.
- Sanding: If the wire brush isn’t enough, use sandpaper. Start with a coarser grit (80-100 grit) to remove the rust, then smooth with a finer grit (120-220 grit).
- Rust Remover: For heavy rust, a chemical rust remover can be effective. Follow the product instructions carefully.
Step 3: Sand the Surface
Sanding creates a slightly rough surface that the new paint can grip onto. This is crucial for good adhesion.
- Metal: After removing rust, sand the entire metal surface with 220-grit sandpaper. This will create a uniform surface for primer and paint.
- Plastic: Lightly sand the surface of plastic furniture with 220-grit sandpaper. You don’t need to remove the existing finish, just scuff it up slightly.
- Wicker: Sanding wicker can be tricky. Use fine-grit sandpaper wrapped around a small block or a sanding sponge. For intricate areas, you might need to use folded sandpaper or a small brush with sandpaper attached.
- Wood: If you’re painting wooden furniture, sand it smooth with 120-grit then 220-grit sandpaper.
Step 4: Wipe Down and Degrease Again
After sanding, dust and debris will be everywhere.
- Dust Off: Use a dry cloth or a vacuum with a brush attachment to remove all sanding dust.
- Tack Cloth: A tack cloth is ideal for picking up any remaining fine dust particles.
- Degrease (Optional but Recommended): Wipe down the entire piece with a clean cloth dampened with mineral spirits or denatured alcohol. This ensures there are no residual oils or residues that could affect paint adhesion. Let it dry completely.
Step 5: Masking
Protect any parts you don’t want to paint. Use painter’s tape to cover hardware, cushions, or any decorative elements.
Applying Primer: The Foundation for a Lasting Finish
Primer is essential for several reasons, especially when spray painting outdoor furniture. It helps paint adhere better, provides a uniform base color, and can block stains or rust.
When to Use Primer
- Metal: Always prime metal furniture to prevent rust and ensure paint adhesion.
- Plastic: Plastic can be slick, so a primer specifically for plastic will help the paint stick.
- Dark to Light Colors: If you’re painting a dark piece a light color, a primer can help you achieve full coverage with fewer coats of paint.
- Previously Painted Surfaces: If the old paint is in poor condition or a drastically different color, priming is a good idea.
How to Apply Primer
- Shake the Can: Shake the primer can vigorously for at least one minute.
- Spray in Light Coats: Hold the can about 10-12 inches away from the surface. Spray in a steady, back-and-forth motion. Overlap each stroke slightly.
- Avoid Heavy Coats: One or two thin coats are better than one thick coat, which can lead to drips and uneven coverage.
- Allow Drying Time: Let the primer dry completely according to the manufacturer’s instructions. This is usually 15-30 minutes.
- Light Sanding (Optional): If you notice any rough spots or drips, you can lightly sand the primer with 220-grit sandpaper and wipe clean before applying paint.
The Art of Spray Painting Lawn Furniture
Now for the main event! Spray painting lawn furniture requires a steady hand and the right technique.
Technique for Spray Painting
- Shake the Paint Can: Just like primer, shake the paint can for at least one minute before and occasionally during use.
- Test Spray: Before spraying your furniture, do a test spray on a piece of cardboard or newspaper to get a feel for the spray pattern and pressure.
- Maintain Distance: Hold the can about 10-12 inches away from the surface. Too close and you risk drips; too far and you’ll get a dusty, uneven finish.
- Steady, Sweeping Motions: Move your arm in a smooth, consistent, side-to-side or up-and-down motion. Start spraying before you reach the edge of the piece and continue spraying past the edge. This avoids getting too much paint at the start and end of each stroke.
- Overlap Strokes: Overlap each spray pass by about 50% to ensure even coverage and prevent missed spots.
- Apply Thin Coats: This is the golden rule of spray painting. Multiple thin coats build up a smooth, durable finish. Thick coats lead to runs, drips, and an unprofessional look.
- Allow Drying Time Between Coats: Follow the paint manufacturer’s recommended drying time between coats. This is crucial for proper adhesion. Typically, this is 15-30 minutes for drying to the touch, but check the can.
- Work in Sections: If you’re painting a large piece, work in manageable sections. This helps ensure you don’t miss any areas and that the paint remains wet enough to blend from one section to the next.
- Rotate Furniture: As you paint, rotate the furniture so you can access all sides, including undersides and legs. It’s often easier to paint the underside first, let it dry, and then flip it.
Spray Painting Different Materials
How to Spray Paint Plastic Furniture
Plastic can be tricky because paint doesn’t always adhere well.
- Surface Preparation is Key: Thorough cleaning and light sanding are absolutely critical for plastic.
- Use Plastic-Specific Primer: A primer designed for plastic will make a huge difference.
- Thin Coats: Apply very thin, even coats. Plastic can sometimes react poorly to heavy coats of paint, leading to a gummy or bubbling finish.
- Flexibility: Some paints are formulated with added flexibility, which is good for plastic that might flex.
Spray Paint Metal Furniture
Metal furniture, especially wrought iron or steel, needs protection from rust.
- Rust Removal: Ensure all rust is removed before priming.
- Rust-Inhibiting Primer: Use a primer that contains rust inhibitors.
- Even Coverage: Aim for smooth, even coats to prevent moisture from getting to the metal.
- Consider High-Heat Paint: If your metal furniture gets very hot in the sun, a high-heat paint might be a consideration, though typically standard outdoor enamel is sufficient.
Spray Paint Wicker Furniture
Wicker furniture can be delicate and has many nooks and crannies.
- Clean Carefully: Gently wash and dry wicker. Avoid soaking it.
- Use a Spray Pattern: Hold the can at an angle to get into the weave. Move the can in various directions.
- Multiple Thin Coats: This is essential to get paint into all the woven areas without creating drips.
- Consider a Spray Shelter: Using a pop-up spray shelter can help contain overspray and allow you to paint from different angles more easily.
Refurbishing Lawn Chairs
When refurbishing lawn chairs, the process is the same, but the smaller size can make them easier to handle.
- Dismantle if Possible: If your chairs can be easily disassembled (e.g., fabric slings removed), it will make painting much easier and result in a cleaner finish.
- Focus on Joints: Pay attention to joints and corners where rust or dirt can accumulate.
- Bottoms Up: Often, it’s easiest to paint the underside and legs first, let them dry, and then flip the chair to paint the top.
What About Chalk Paint Lawn Furniture?
Can you use chalk paint lawn furniture? Yes, you can, but with caveats for outdoor use.
- Durability: Traditional chalk paint is not inherently formulated for outdoor durability. It’s porous and can absorb moisture, leading to peeling or degradation.
- Sealing is Crucial: If you opt for chalk paint, you MUST seal it with a high-quality outdoor sealant or clear coat. Look for polyurethanes or sealants specifically designed for exterior furniture.
- Prep is Still Key: Proper cleaning, light sanding, and priming (especially for slick surfaces) are still important for chalk paint adhesion.
- Durability Concerns: Even with a good sealant, chalk paint may not be as durable outdoors as specialized exterior spray paints, and it might require more frequent touch-ups. For high-traffic or heavily exposed furniture, a traditional exterior enamel is often a more robust choice.
Applying the Top Coat (Optional but Recommended)
For added protection and a smoother finish, you can apply a clear top coat.
- Use an Exterior-Grade Clear Coat: Ensure it’s rated for outdoor use and compatible with your paint.
- Apply Thin Coats: Just like paint, apply the clear coat in thin, even layers.
- Allow Full Curing: Clear coats often need longer to cure (harden fully) than spray paints. Check the product instructions.
Drying and Curing Times
This is where patience pays off.
- Drying to the Touch: This usually takes 15-30 minutes. The surface won’t be sticky.
- Recoating: Most paints recommend waiting 30 minutes to an hour between coats.
- Curing: This is when the paint fully hardens and reaches its maximum durability. Curing can take anywhere from 24 hours to several days, or even weeks, depending on the paint type and environmental conditions. Avoid heavy use or stacking furniture until it has fully cured.
Tips for a Flawless Finish
- Work in Good Conditions: Avoid painting in direct, hot sunlight, humid weather, or windy conditions. Ideal temperatures are usually between 60-80°F (15-27°C) with low humidity.
- Ventilation is Key: Always work in a well-ventilated area. The fumes can be strong.
- Don’t Rush: Rushing the process is the quickest way to get an imperfect finish. Take your time with preparation and application.
- Clean Your Nozzle: If the nozzle clogs, try to clear it with a pin or by soaking the nozzle in warm water (if the paint is water-based). For oil-based paints, use mineral spirits.
- Store Cans Properly: Store leftover spray paint cans upside down for a few seconds to clear the nozzle, then store them upright in a cool, dry place.
Frequently Asked Questions (FAQ)
Q1: What is the best spray paint for metal patio furniture?
A1: The best spray paint for metal patio furniture is an exterior-grade enamel spray paint that specifically mentions rust inhibition. Brands like Rust-Oleum and Krylon offer excellent options formulated for metal.
Q2: Can I spray paint plastic outdoor furniture without priming?
A2: While you can spray paint plastic without priming, it is highly discouraged. Plastic surfaces are often smooth and non-porous, making it difficult for paint to adhere. Using a primer specifically designed for plastic will greatly improve paint adhesion and the longevity of your finish.
Q3: How many coats of spray paint do I need for lawn furniture?
A3: Typically, 2-3 thin coats of spray paint are recommended for most lawn furniture. This provides even coverage and durability. Some projects may require an extra coat, especially when transitioning from a dark to a light color or if the initial coverage isn’t uniform. Always allow adequate drying time between coats.
Q4: What should I use for removing old paint from lawn furniture?
A4: For removing old paint, you can use a combination of methods:
* Scrapers or Putty Knives: For peeling or loose paint.
* Sandpaper: Start with a coarser grit (like 120-grit) for tough paint and move to a finer grit (220-grit) for smoothing.
* Wire Brush: Excellent for metal furniture with rust and flaking paint.
* Chemical Paint Strippers: For stubborn, old paint layers, but use with caution and proper safety gear.
Q5: How do I prep furniture for spray paint?
A5: Thorough preparation is crucial. The steps include:
1. Cleaning: Wash the furniture thoroughly with soap and water, and degrease if necessary.
2. Stripping/Sanding: Remove loose paint, rust, and then lightly sand the entire surface to create adhesion.
3. Wiping Down: Clean off all dust and debris with a tack cloth or a damp cloth with mineral spirits.
4. Masking: Cover any areas you don’t want to paint.
Q6: Can I spray paint wicker furniture?
A6: Yes, you can spray paint wicker furniture. The key is to use thin, even coats and to manipulate the can to get into all the woven areas. A primer designed for outdoor use is also recommended.
Q7: What is the best way to spray paint metal furniture?
A7: The best way is to ensure it’s completely free of rust, apply a rust-inhibiting primer, and then use thin, even coats of exterior-grade spray paint. Allow proper drying and curing time between coats for maximum durability.
Q8: Is it okay to use chalk paint on lawn furniture?
A8: While you can use chalk paint, it’s generally not recommended for outdoor furniture without significant sealing. Chalk paint is porous and needs to be protected with multiple coats of a high-quality outdoor sealant or clear coat to withstand the elements. Standard exterior spray paints are usually more durable for outdoor applications.
By following these steps, you can confidently tackle your lawn furniture projects and achieve beautiful, long-lasting results. Enjoy your revitalized outdoor living space!