
Can you reseed Bermuda grass? Yes, you can reseed Bermuda grass, and doing so is a fantastic way to bring life back to thin or patchy areas of your lawn, or even establish a new, lush green carpet. This guide will walk you through the entire process, from preparation to post-seeding care, ensuring your Bermuda lawn thrives.
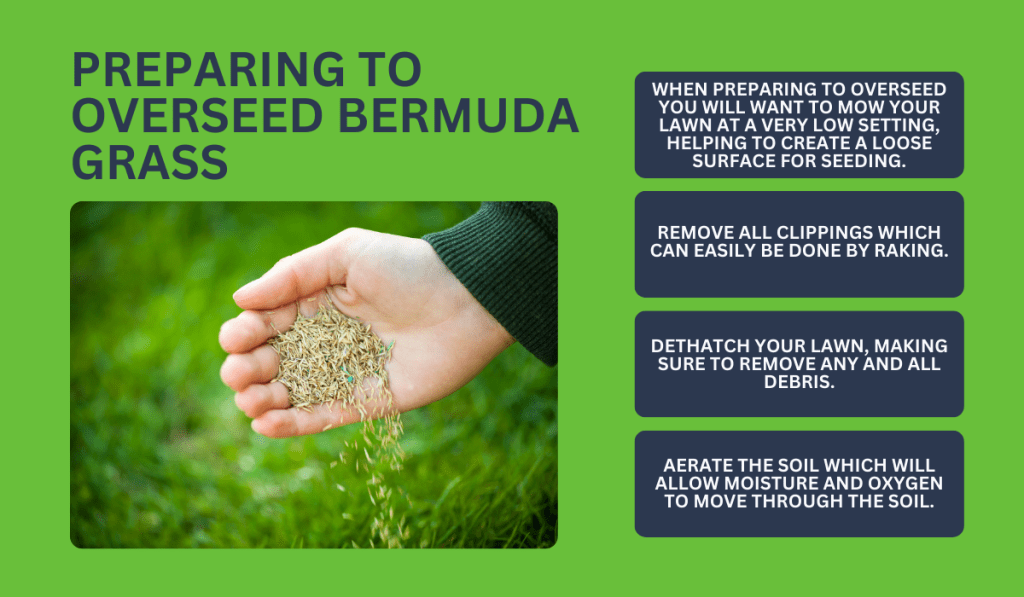
Image Source: sodlawn.com
Revitalizing Your Bermuda Lawn: A Comprehensive Guide
Bermuda grass is a popular choice for warm-season lawns due to its durability, drought tolerance, and ability to recover from wear. However, even the toughest grass can suffer from thinning, bare spots, or the encroachment of weeds. Reseeding is an effective method for Bermuda grass repair and for enhancing the overall health and appearance of your lawn. Whether you’re tackling small patches or aiming for a complete Bermuda lawn renovation, understanding the right techniques is crucial for success.
Why Reseed Your Bermuda Lawn?
Over time, several factors can lead to a less-than-perfect Bermuda lawn:
- Wear and Tear: High foot traffic, pets, and children playing can compact the soil and damage grass blades.
- Pests and Diseases: Insect infestations or fungal diseases can weaken and kill grass, leaving bare patches.
- Environmental Stress: Drought, extreme heat, or prolonged shade can cause stress and thinning.
- Weed Competition: Weeds can outcompete grass for resources like sunlight, water, and nutrients, leading to sparser growth.
- Winter Damage: In colder regions, Bermuda grass can go dormant and suffer damage if not properly prepared for winter.
Bermuda grass seeding is a proactive approach to address these issues and achieve that coveted, dense, green lawn.
When to Reseed Bermuda Grass: Timing is Everything
The best time to reseed Bermuda grass is during its active growing season, which is when temperatures are consistently warm. This typically falls between late spring and early summer.
- Ideal Temperature Range: Bermuda grass thrives when soil temperatures are between 70°F and 90°F (21°C to 32°C). Air temperatures should also be consistently warm, ideally in the 80s and 90s Fahrenheit (27°C to 35°C).
- Why This Timing Matters: Seeding during the active growing season ensures the young grass seedlings have ample time to establish a strong root system before cooler temperatures arrive, increasing their survival rate. Seeding too early or too late can significantly reduce germination and growth.
- Avoiding Dormancy: Do not attempt to reseed Bermuda grass while it is dormant or during periods of extreme heat stress, as germination will be poor, and seedlings are unlikely to survive.
Understanding the Growing Season
Bermuda grass is a warm-season grass, meaning it performs best in hot weather and goes dormant (turns brown) in cooler temperatures. This characteristic is why timing your seeding efforts is so vital.
Choosing the Right Bermuda Grass Seed
Selecting the correct Bermuda grass seed is paramount for a successful reseeding project. There are many varieties, each with slightly different characteristics.
Types of Bermuda Grass Seed:
- Common Bermuda: This is a more genetically diverse type, often less expensive, but can be more prone to disease and may have a coarser texture.
- Improved Varieties (e.g., Tifway 419, Celebration, Princess 77): These cultivars are bred for specific traits such as finer texture, darker green color, disease resistance, and faster establishment. They are generally more expensive but offer superior results.
Factors to Consider When Buying Seed:
- Germination Rate: Look for seed with a high germination rate (ideally 85% or higher).
- Purity: Ensure the seed is pure, meaning it contains minimal weed seeds or other grass types.
- Variety Suitability: Choose a variety that matches your climate and desired lawn characteristics. If you’re unsure, consult a local garden center or extension office for recommendations.
- Seed Coating: Some seeds are coated with nutrients or fungicides to aid in germination and early growth.
Preparing Your Lawn for Reseeding
Proper preparation is the foundation for successful seeding a Bermuda lawn. This involves clearing the area and creating an optimal environment for the new seeds.
Step 1: Clear the Area
- Remove Debris: Rake up any dead grass, leaves, rocks, or other debris. This ensures good seed-to-soil contact.
- Address Bare Patches: For small, bare spots, loosen the soil with a trowel or rake. Remove any weeds or dead grass.
- Dealing with Thin Lawns: If your lawn is generally thin but not completely bare, you can skip removing the existing grass. However, you’ll want to prepare the surface by dethatching and aerating.
Step 2: Dethatch Your Lawn
- What is Thatch? Thatch is a layer of dead and living grass stems, roots, and debris that accumulates between the grass blades and the soil surface. A thin layer is beneficial, but excessive thatch can prevent water, air, and nutrients from reaching the soil and hinder seed germination.
- When to Dethatch: Dethatch your Bermuda lawn in late spring or early summer, just before you plan to reseed, when the grass is actively growing and can recover quickly.
- How to Dethatch: You can rent a dethatcher (also called a power rake) or use a manual dethatching rake. Rake vigorously to pull up the thatch. For severe thatch, a power rake is more effective.
- After Dethatching: Rake up and dispose of the removed thatch.
Step 3: Aerate Your Lawn
- What is Aeration? Aeration involves creating small holes in the soil to relieve compaction and improve air, water, and nutrient penetration to the root zone.
- Why Aerate Before Seeding? Aeration is crucial for helping new seeds establish a strong root system, especially in compacted soil.
- How to Aerate: Use a core aerator (rentable) which pulls plugs of soil out of the ground. This is more effective than spike aeration.
- After Aerating: You can lightly rake over the lawn to break up the soil plugs.
Step 4: Amend the Soil (If Necessary)
- Soil Testing: Consider getting a soil test to determine pH levels and nutrient deficiencies. Bermuda grass prefers a slightly acidic to neutral pH (6.0-7.0).
- Adding Topsoil or Compost: If your soil is poor or you have significant bare spots, lightly spread a thin layer of good quality topsoil or compost over the area. This provides a nutrient-rich seedbed. Avoid burying existing grass too deeply.
- Fertilizer: If your soil test indicates nutrient deficiencies, apply a starter fertilizer that is formulated for new grass seed. Look for a higher phosphorus content (the middle number in N-P-K ratios).
The Reseeding Process: Step-by-Step
Now that your lawn is prepped, it’s time to introduce the new Bermuda grass seed. This is where the actual seeding a Bermuda lawn happens.
Step 1: Apply the Bermuda Grass Seed
- Seeding Rate: Follow the recommended seeding rate for the specific Bermuda grass variety you’ve chosen. Over-seeding can lead to competition between the new seedlings, while under-seeding will result in a sparse lawn. Typically, for Bermuda grass overseeding, rates range from 1 to 2 pounds of seed per 1,000 square feet.
- Using a Spreader: A broadcast spreader is ideal for evenly distributing the seed across the lawn. Calibrate your spreader according to the seed manufacturer’s instructions.
- Applying in Two Directions: For the most even coverage, apply half the seed in one direction (e.g., north to south) and the other half perpendicular to that (e.g., east to west).
- Hand Seeding: For small areas or patchy spots, you can hand-broadcast the seed, ensuring even distribution.
Step 2: Ensure Good Seed-to-Soil Contact
This is a critical step often overlooked. The seed needs to be in direct contact with the soil to germinate.
- Light Raking: Gently rake the seeded area to work the seeds into the top 1/8 to 1/4 inch of soil. This also helps cover the seeds with a thin layer of soil, protecting them from birds and drying out.
- Using a Roller: You can use a lawn roller to press the seeds into the soil. This is especially helpful on bare patches. Ensure the roller is not too heavy, as excessive compaction can hinder germination.
Step 3: Apply a Starter Fertilizer (If Not Done Earlier)
- If you haven’t already applied a starter fertilizer during soil amendment, do so now. This provides essential nutrients for the young seedlings.
Step 4: Water Gently and Consistently
- Initial Watering: After seeding, water the area thoroughly but gently. You want to moisten the soil without washing the seeds away.
- Maintaining Moisture: Keep the top layer of soil consistently moist until germination occurs. This may mean watering lightly several times a day, especially in warm or windy conditions. Avoid letting the seeded areas dry out completely.
- Watering Technique: Use a fine spray to avoid disturbing the seeds.
Bermuda Grass Care After Seeding
Once the seeds have germinated and you see young grass blades, your care routine shifts. This is the Bermuda grass care after seeding phase.
Watering New Seedlings
- Gradual Reduction in Watering: As the seedlings grow and establish, you can gradually reduce the frequency of watering but increase the duration. Aim for deeper, less frequent watering to encourage strong root development.
- Monitoring Soil Moisture: Continue to check the soil moisture regularly. The goal is to keep the root zone moist.
- Transition to Mature Lawn Watering: Once the new grass is about an inch or two tall, you can transition to a watering schedule similar to your established Bermuda grass lawn – deep and infrequent.
Mowing New Growth
- First Mowing: Wait until the new grass reaches a height of about 2-3 inches.
- Mowing Height: Set your mower to a higher setting than usual for the first few mows to avoid stressing the young grass.
- Sharp Mower Blades: Always use sharp mower blades. Dull blades can tear the tender grass, making it susceptible to disease.
- Do Not Bag Clippings: Leave the clippings on the lawn; they act as a natural fertilizer.
Fertilizing Young Bermuda Grass
- First Fertilization: Wait until the new grass has been mowed at least 3-4 times. This is typically around 4-6 weeks after germination.
- Type of Fertilizer: Use a balanced fertilizer formulated for lawns. For Bermuda grass, a nitrogen-rich fertilizer can promote lush growth, but avoid over-fertilizing, which can burn the young grass. Follow product instructions carefully.
- Iron Supplementation: Bermuda grass benefits from iron, which helps promote a deep green color. Consider a fertilizer with added iron or a separate iron supplement if your lawn appears pale.
Weed Control
- Avoid Herbicides Initially: Do not apply any herbicides to newly seeded Bermuda grass until it is well-established (at least 4-6 weeks old and has been mowed several times). Many herbicides can damage or kill young grass.
- Manual Removal: For weeds that appear during the germination and establishment phase, hand-pull them carefully, ensuring you remove the entire root.
- Pre-emergent Herbicides: If you are reseeding in the fall to get a head start on spring weeds, you might consider a pre-emergent herbicide applied before seeding, but this requires careful timing and product selection to avoid hindering Bermuda grass germination. It’s generally safer to focus on post-emergent control once the grass is established.
Troubleshooting Common Reseeding Issues
Even with the best efforts, you might encounter challenges. Here’s how to address them.
Issue: Poor Germination
- Possible Causes: Old seed, improper seed-to-soil contact, soil too dry, soil too wet (waterlogged), incorrect soil temperature, disease.
- Solutions: Use fresh seed, ensure good seed-to-soil contact, maintain consistent moisture without waterlogging, check soil temperatures, and ensure good drainage.
Issue: Seed Washed Away
- Possible Causes: Heavy rainfall or over-watering on a slope.
- Solutions: Use erosion control blankets or straw mulch on slopes after seeding. Water more gently and in shorter intervals.
Issue: Thin or Patchy Growth
- Possible Causes: Under-seeding, poor soil quality, insufficient sunlight, inconsistent watering.
- Solutions: Consider overseeding again in a different spot if allowed by the seed type and season. Amend the soil and ensure adequate sunlight. Review your watering schedule.
Issue: Fungal Diseases
- Possible Causes: Over-watering, poor air circulation, high humidity.
- Solutions: Water in the morning so grass blades can dry during the day. Improve air circulation through dethatching and aeration. Use a fungicide if necessary, but be cautious with young grass.
Overseeding Bermuda Grass: Enhancing Density
Bermuda grass overseeding is a specific technique where you add seed to an existing lawn to thicken it up. This is a common practice for Bermuda grass repair and maintenance.
When to Overseed
- Timing: Similar to reseeding, the best time for overseeding Bermuda is during its active growing season (late spring to early summer).
- Reasons: Overseeding is ideal for filling in thin areas, improving the lawn’s color, and increasing its density to outcompete weeds.
The Process for Overseeding
The process for overseeding is very similar to reseeding, with a few key differences in preparation:
- Mow Low: Mow the existing Bermuda grass shorter than you typically would. This helps the new seeds get to the soil.
- Dethatch and Aerate: These steps are crucial for overseeding to ensure good seed-to-soil contact in an established lawn.
- Apply Seed: Use a spreader at the recommended rate for overseeding (often slightly lower than a full reseeding rate).
- Rake Gently: Lightly rake to ensure seed-to-soil contact.
- Water Consistently: Keep the area consistently moist until germination.
- Post-Seeding Care: Follow the same watering, mowing, and fertilizing guidelines as for reseeding.
Bermuda Lawn Renovation: A Fresh Start
For severely damaged or degraded Bermuda lawns, a full Bermuda lawn renovation might be necessary. This typically involves removing the old turf and starting over, or a more aggressive dethatching and reseeding process.
-
When to Consider Renovation:
- Heavy weed infestation that cannot be controlled by other means.
- Severe damage from pests, diseases, or extreme weather.
- Poor soil conditions that cannot be easily amended.
- An undesirable variety of Bermuda grass that you wish to replace.
-
Methods for Renovation:
- Complete Removal and Reseeding: This involves killing the existing grass (e.g., with a non-selective herbicide), removing the dead turf, preparing the soil, and then reseeding with a high-quality Bermuda grass seed.
- Aggressive Dethatching and Reseeding: For less severe cases, extremely thorough dethatching followed by overseeding can bring a lawn back from the brink.
Growing Bermuda Grass from Seed: Key Takeaways
Growing Bermuda grass from seed requires patience and diligent care, especially during the establishment phase.
- Patience is Key: Bermuda grass seed can take anywhere from 7 to 21 days or even longer to germinate, depending on the variety and conditions.
- Consistency in Care: Consistent moisture, appropriate temperatures, and gradual introduction to mowing and fertilizing are crucial for success.
- Long-Term Benefits: While establishing a Bermuda lawn from seed takes time, the result is a resilient, beautiful, and healthy lawn that can provide enjoyment for years to come.
Frequently Asked Questions (FAQ)
Q1: Can I overseed Bermuda grass in the fall?
A1: No, it is not recommended to overseed Bermuda grass in the fall. Bermuda grass is a warm-season grass and will not germinate or establish properly in cool fall temperatures. Overseeding should only be done during its active growing season in late spring or early summer. If you want to overseed in the fall, consider using a cool-season grass like ryegrass for temporary winter cover.
Q2: How much water does newly seeded Bermuda grass need?
A2: Newly seeded Bermuda grass needs consistent moisture. The top inch of soil should be kept moist at all times until germination. This might mean watering lightly multiple times a day, especially in hot or windy weather. Once the grass germinates and starts to grow, you can gradually reduce watering frequency while increasing the duration of each watering to encourage deep root growth.
Q3: How soon can I mow my newly seeded Bermuda lawn?
A3: You should wait until the new Bermuda grass reaches a height of about 2 to 3 inches before the first mowing. Set your mower blades higher for the first few mows to avoid stressing the young grass.
Q4: What is the best type of Bermuda grass seed for my area?
A4: The best type of Bermuda grass seed depends on your specific climate, soil conditions, and desired lawn appearance. Improved varieties often offer better disease resistance and finer texture. Consulting with your local extension office or a reputable garden center is the best way to determine the most suitable variety for your region.
Q5: Why is my Bermuda grass seed not germinating?
A5: Several factors can cause poor germination, including old seed, poor seed-to-soil contact, inconsistent watering (soil drying out), soil that is too wet, incorrect soil temperature, or disease. Ensure you are using fresh seed, that it is in contact with the soil, and that the soil moisture and temperature are within the ideal range for Bermuda grass growth.
By following these detailed steps and tips, you’ll be well on your way to enjoying a lush, healthy, and beautiful Bermuda lawn. Remember that consistent care and attention to detail are the keys to success in Bermuda grass repair and maintenance.