
Yes, you can paint rocks for your garden! It’s a fun and easy way to add personality and color to your outdoor space. This guide will walk you through everything you need to know, from picking the right rocks to making your painted creations last through the seasons.
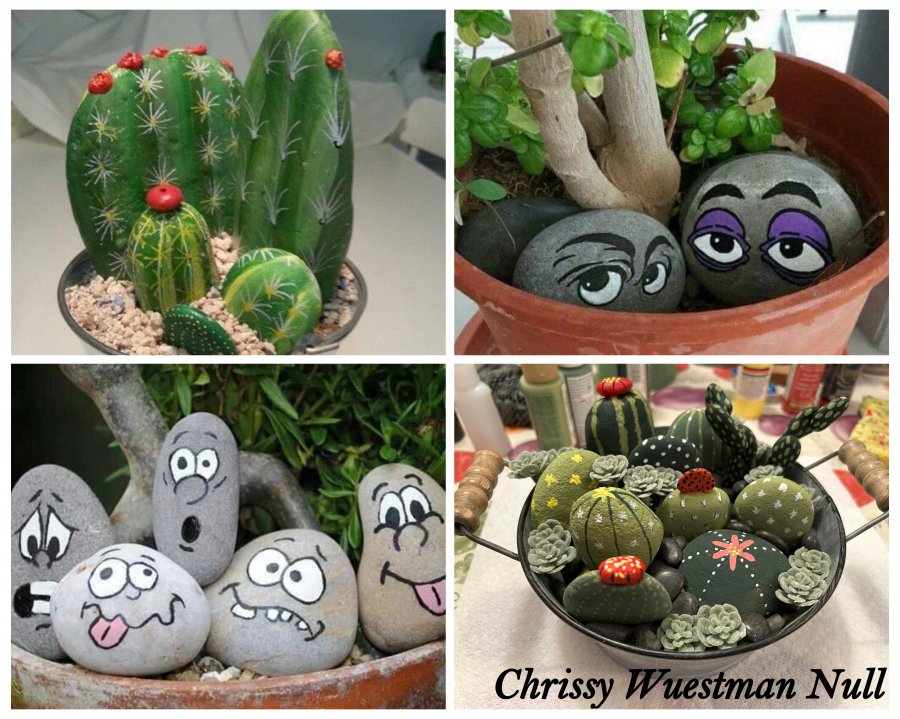
Image Source: fb-rocks.com
Bringing Your Garden to Life with Painted Rocks
Your garden is more than just plants and soil; it’s a canvas waiting for your personal touch. Painted rocks offer a simple yet impactful way to inject color, whimsy, and character into your beloved outdoor haven. Whether you’re looking for charming ladybugs, inspirational quotes, or abstract designs, rock painting ideas are as limitless as your imagination. Creating garden rock art is a fantastic project for all ages, bringing families together and adding a unique flair to flower beds, pathways, or even as standalone decorative pieces.
Why Paint Rocks for Your Garden?
There are many reasons why painting rocks for your garden is such a popular and rewarding activity:
- Personalization: Make your garden truly yours with custom designs.
- Affordability: Rocks are free, and paint is relatively inexpensive.
- Creativity Boost: It’s a fantastic outlet for artistic expression.
- Family Fun: It’s an activity that can be enjoyed by everyone, from young children to grandparents.
- Durability: With the right techniques and materials, your painted rocks can last for years.
- Nature-Friendly: It’s a way to enhance your garden without harming the environment.
What You’ll Need: Your Outdoor Rock Painting Supplies
Gathering your supplies is the first step to creating beautiful painted rock garden decor. Here’s a breakdown of what you’ll need:
Essential Materials
- Rocks: Smooth, flat rocks are best for painting. Look for them in your garden, at craft stores, or on nature walks (just be mindful of local regulations about collecting).
- Weatherproof Rock Paint: This is crucial for ensuring your designs withstand the elements. Acrylic paint for rocks is the most common and versatile choice. Opt for high-quality acrylics designed for outdoor use.
- Paintbrushes: A variety of sizes is helpful. Smaller brushes for details and larger ones for base coats.
- Sealant/Varnish: A clear, outdoor-grade sealant is essential for protecting your painted rocks. This is how you ensure your art is weatherproof rock paint ready.
- Water Container: For rinsing brushes.
- Paper Towels or Rags: For drying brushes and wiping up spills.
- Drop Cloth or Newspaper: To protect your work surface.
Optional but Helpful Tools
- Graphite Pencil or Chalk: For sketching designs onto the rocks.
- Fine-Tip Permanent Markers: For adding details and outlines.
- Stencils: For creating repeatable patterns or lettering.
- Sponge Daubers: For creating textures or applying base colors quickly.
- Clear Spray Sealant: An alternative to brush-on sealant, often easier for larger quantities of rocks.
Choosing the Perfect Rocks for Painting
Not all rocks are created equal when it comes to painting. The shape, size, and texture of your chosen rocks will significantly impact your rock painting techniques and the final look of your garden rock art.
What Makes a Good Painting Rock?
- Smooth Surface: Rocks with a smooth, even surface are easiest to paint on. Rough or porous rocks can absorb too much paint and make fine details difficult.
- Flat or Gently Curved: Flat rocks are ideal for painting designs, faces, or lettering. Gently curved rocks can add a subtle dimension to your artwork. Avoid rocks with sharp edges or very uneven surfaces unless you’re going for a rustic look.
- Size Matters: Consider where you’ll place your painted rocks in the garden. Smaller pebbles are perfect for lining pathways or highlighting plants, while larger rocks can be focal points.
- Cleanliness: Ensure your rocks are clean before you start painting. Dirt, moss, or lichen can prevent paint from adhering properly.
Finding and Preparing Your Rocks
-
Where to Find Rocks:
- Your Backyard: Often, the best rocks are already in your garden!
- Parks and Nature Trails: Always check local regulations before collecting. Some areas prohibit removing natural items.
- Beaches or Riverbeds: Smooth, water-worn rocks are excellent candidates.
- Craft Stores or Garden Centers: You can purchase smooth river rocks or decorative stones if you can’t find suitable ones naturally.
-
Cleaning Your Rocks:
- Rinse: Give your rocks a good rinse under running water to remove loose dirt.
- Scrub: Use a stiff brush to scrub away any stubborn dirt, moss, or algae. A mixture of water and mild soap can be helpful.
- Soak (if necessary): For very dirty rocks, you might need to soak them in warm, soapy water for an hour or two.
- Dry Completely: This is a critical step. Ensure your rocks are thoroughly dry before painting. You can let them air dry in the sun or dry them with a clean cloth.
Step-by-Step Guide to Painting Rocks for the Garden
Now that you have your supplies and your rocks are clean and dry, it’s time to get creative! Follow these steps for successful painting pebbles for outdoors.
Step 1: Priming Your Rocks (Optional but Recommended)
While you can paint directly onto clean rocks, applying a primer can make your colors pop and help the paint adhere better.
- Base Coat: Apply one or two thin coats of a neutral color (white or light grey works well) using your acrylic paint for rocks. This creates a uniform surface for your designs.
- Allow to Dry: Let the primer dry completely according to the paint manufacturer’s instructions.
Step 2: Sketching Your Design
Before you dive in with paint, it’s a good idea to sketch your design onto the rock.
- Light Pencil or Chalk: Use a graphite pencil or a piece of chalk to lightly draw your design.
- Keep it Simple: For beginners, start with simple shapes, patterns, or single images like ladybugs, flowers, or hearts.
- Visualize: Imagine how the design will fit the shape of your rock.
Step 3: Painting Your Design
This is where the fun really begins!
- Base Colors: Start with the larger areas of color. Apply thin, even coats.
- Layering: Allow each layer of paint to dry completely before adding the next. This prevents colors from mixing unintentionally and creates a smoother finish.
- Detail Work: Use smaller brushes to add details like eyes, patterns, or outlines.
- Tips for Acrylic Paint:
- Thinning: If your acrylic paint is too thick, you can add a small amount of water to thin it.
- Drying Time: Acrylics dry quickly, which is great for layering, but can also mean you need to work a bit faster on larger areas.
- Mistakes: Most acrylic paints are water-based, so you can often wipe away mistakes with a damp cloth before they dry completely.
Step 4: Adding Details and Outlines
Once your base colors are dry, you can add those finishing touches that make your garden rock art stand out.
- Fine Liners: Use a fine-tip permanent marker or a very thin paintbrush with black or dark paint to add outlines. This can make your design look more polished and defined.
- Shading and Highlights: Experiment with adding a touch of darker paint for shadows or a dab of lighter paint for highlights to give your painted rocks more depth.
Step 5: Sealing Your Painted Rocks
This is arguably the most important step for creating weatherproof rock paint creations that will last. Sealing protects your artwork from rain, sun, and wear.
How to Seal Painted Rocks
- Ensure Dryness: Make absolutely sure your painted rocks are completely dry. This usually means waiting at least 24 hours after the last coat of paint.
- Choose Your Sealant:
- Brush-On Varnish: Available in gloss, satin, or matte finishes. Apply 2-3 thin, even coats.
- Clear Spray Sealant: A quick and easy option. Hold the can about 8-12 inches away from the rock and spray in a sweeping motion. Apply 2-3 light coats.
- Application:
- Work in a Ventilated Area: Especially if using spray sealant.
- Thin Coats are Key: Avoid applying the sealant too thickly, as it can pool and drip.
- Full Coverage: Ensure all painted surfaces are covered.
- Drying Time: Allow the sealant to dry completely according to the product instructions before placing your rocks in the garden. This can take anywhere from a few hours to 24 hours, depending on the product and humidity.
Creative Rock Painting Ideas for Your Garden
The possibilities for rock painting ideas are endless! Here are some popular and inspiring concepts to get you started:
Fun and Whimsical Designs
- Ladybugs and Caterpillars: Classic and cheerful, these are great for kids.
- Flowers and Butterflies: Bring vibrant nature scenes to your garden.
- Fairy Houses: Paint detailed doors, windows, and roofs to create miniature fairy dwellings.
- Animals: Owls, frogs, hedgehogs, or even mythical creatures can add personality.
- Snail Shells: Paint colorful patterns on egg-shaped rocks.
Inspirational and Sentimental Rocks
- Inspirational Quotes: Paint uplifting messages or single words like “Peace,” “Love,” or “Grow.”
- Positive Affirmations: Similar to quotes, but focused on self-encouragement.
- Memorial Rocks: Dedicate a rock to a loved one or pet with their name and a special symbol.
- Gratitude Rocks: Write down things you are thankful for.
Decorative and Themed Rocks
- Mandala Patterns: Intricate, circular designs that add a touch of artistry.
- Geometric Shapes: Simple lines, dots, and shapes can create modern garden rock art.
- Faux Gemstones: Use metallic paints to mimic the look of precious stones.
- “Googly Eye” Rocks: Paint simple faces with prominent googly eyes for a quirky touch.
- Themed Gardens: If you have a fairy garden, a butterfly garden, or a zen garden, paint rocks to match the theme.
Tips for Specific Rock Painting Techniques
- Dot Painting: Use the end of a paintbrush, a stylus, or a dotting tool to create perfect dots. This is the foundation of mandala art.
- Stippling: Similar to dot painting, but using many small dots to create shading and texture.
- Marbleizing: Swirl different colors together on a wet base coat or in a water-filled container for a marbled effect.
- Ombre Effect: Blend colors smoothly from one shade to another.
- Layering with Stencils: Use stencils for clean lines and repetitive patterns.
Maintaining Your Painted Rock Garden Decor
Even with the best sealant, your painted rock garden decor will benefit from occasional maintenance to keep them looking vibrant.
Protecting Your Art from the Elements
- Harsh Sun: While sealant helps, prolonged exposure to intense sunlight can fade colors over time. Consider placing highly detailed or brightly colored rocks in slightly shaded areas of your garden.
- Freezing Temperatures: If you live in a region with harsh winters, it’s best to bring your painted rocks indoors during the coldest months. Water trapped in tiny cracks can freeze, expand, and cause the paint or the rock itself to crack or chip.
- Heavy Rain: Your sealant should protect your paint from water, but if you notice any peeling or chipping, it might be time for a touch-up.
Refreshing Your Painted Rocks
- Re-Sealing: After a year or two, or if you notice the sealant starting to dull, you can apply another layer of sealant to refresh the protection. Clean the rocks thoroughly first.
- Touch-Ups: If a small area gets chipped or scratched, you can touch it up with the original paint color and then re-seal the touched-up area.
Frequently Asked Questions About Painting Rocks for the Garden
Q1: What kind of paint is best for painting rocks outdoors?
A1: High-quality acrylic paints designed for outdoor use are the best choice. Look for terms like “weatherproof” or “outdoor acrylics” on the label.
Q2: Do I need to seal my painted rocks?
A2: Yes, absolutely. Sealing is crucial to protect your painted rocks from moisture, UV rays, and general wear and tear, ensuring they remain beautiful in your garden for a long time.
Q3: Can I use any kind of rock?
A3: Smooth, flat, or gently curved rocks are easiest to paint on. Avoid very porous or rough rocks, as the paint may not adhere well.
Q4: How long will my painted rocks last?
A4: With proper preparation, good quality paint, and thorough sealing, your painted rocks can last for several years. Bringing them indoors during harsh winter months can significantly extend their lifespan.
Q5: What if I make a mistake while painting?
A5: If the acrylic paint is still wet, you can usually wipe it away with a damp cloth. Once dry, you can often paint over it, or for minor mistakes, a touch-up after sealing might be possible.
Q6: Can kids paint rocks?
A6: Yes! Rock painting is a fantastic activity for children. Just ensure you supervise them, especially when using brushes and paints, and opt for non-toxic, washable paints if possible (though sealing will make them permanent).
Q7: Where can I buy outdoor rock painting supplies?
A7: You can find outdoor rock painting supplies at most craft stores, art supply stores, and online retailers. This includes acrylic paints, brushes, sealants, and sometimes even pre-selected rocks.
Q8: How do I make sure the paint doesn’t wash off?
A8: Using acrylic paint for rocks that is specifically designed for outdoor use and applying a good quality outdoor sealant are the most effective ways to prevent the paint from washing off.
Q9: Can I paint pebbles for outdoors?
A9: Yes, painting pebbles for outdoors is very popular! The same principles of cleaning, painting with acrylics, and sealing apply to pebbles as they do to larger rocks.
Q10: What are some simple rock painting techniques for beginners?
A10: Simple techniques include painting basic shapes like hearts or ladybugs, creating dot patterns, or writing single inspirational words. Using stencils can also simplify designs.
By following these guidelines, you can transform ordinary rocks into extraordinary painted rock garden decor that adds charm and personality to your garden for seasons to come. Happy painting!