
Yes, you can fence a garden yourself! This guide will walk you through the process of DIY garden fencing, from choosing the right materials to the final garden fence installation.
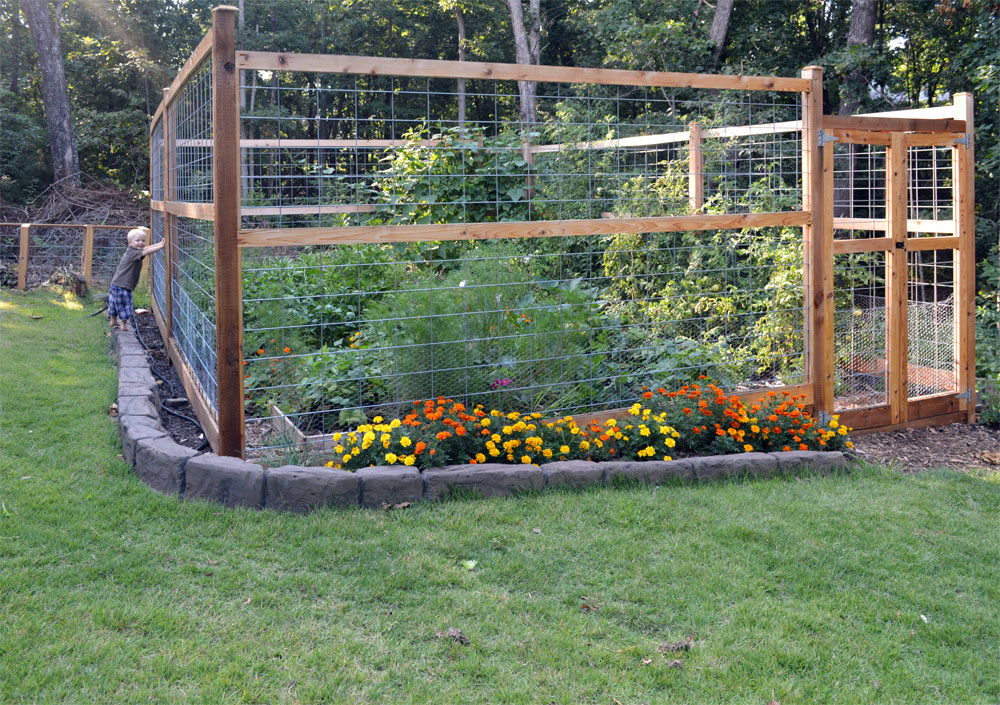
Image Source: www.theseasonalhomestead.com
Why Fence Your Garden?
Fencing your garden offers many benefits. It protects your plants from hungry critters like rabbits and deer. It can also keep pets contained or out of sensitive areas. A well-chosen fence can add beauty and define your outdoor space, enhancing its appeal. For a vegetable garden, a fence is often essential for a good harvest. It can also serve as garden border fencing, clearly marking your property lines or garden beds.
Choosing Your Garden Fence Materials
The first step in any garden fence installation project is selecting the right materials. Your choice will depend on your budget, the look you want, and the function of the fence.
Popular Garden Fence Materials
Here’s a look at common options:
-
Wood:
- Pros: Natural look, versatile, can be painted or stained, good for privacy garden fence designs.
- Cons: Can rot or warp if not maintained, requires regular treatment.
- Types: Cedar, pine, redwood. Cedar and redwood are naturally resistant to insects and decay.
-
Vinyl (PVC):
- Pros: Low maintenance, durable, resistant to rot and insects, comes in various styles.
- Cons: Can be more expensive upfront, may become brittle in extreme cold, less natural appearance.
-
Metal:
- Chain Link:
- Pros: Affordable, durable, good visibility, effective for pet-proof garden fence needs.
- Cons: Can look industrial, offers little privacy.
- Aluminum/Wrought Iron:
- Pros: Elegant, durable, low maintenance, great for decorative garden fence styles.
- Cons: Can be expensive, offers minimal privacy.
- Steel:
- Pros: Strong, durable, good for security.
- Cons: Can rust if not treated, heavier to work with.
- Chain Link:
-
Bamboo:
- Pros: Eco-friendly, natural look, relatively inexpensive.
- Cons: Less durable than other materials, can degrade over time, may not be suitable for very tall fences.
-
Living Fences (Hedges):
- Pros: Beautiful, eco-friendly, provides habitat for wildlife, can offer excellent privacy.
- Cons: Takes time to grow, requires regular pruning and maintenance, not immediately effective for containment.
Factors to Consider When Choosing
- Budget: Garden fence cost varies greatly by material. Wood and chain link are often the most affordable.
- Purpose: Do you need a privacy garden fence, a pet-proof garden fence, or a decorative garden fence? This will guide your material and style selection.
- Aesthetics: How do you want your fence to look? Match it to your home’s style.
- Maintenance: How much time are you willing to spend on upkeep? Vinyl and metal generally require less maintenance than wood.
- Local Regulations: Check if there are any height or style restrictions in your area.
Types of Garden Fences
The type of garden fence you choose is as important as the material. Different types serve different purposes and create different looks.
Common Garden Fence Styles
- Picket Fences: Classic and charming, typically made of wood or vinyl. Good for garden border fencing and defining spaces. Offer limited privacy.
- Privacy Fences: Designed to block views, often solid panels of wood, vinyl, or composite materials. Ideal for creating secluded areas or for a privacy garden fence.
- Lattice Fences: Open, decorative patterns, often used for accenting or climbing plants. Good for a decorative garden fence and can be combined with other types.
- Post and Rail Fences: Simple and rustic, often used in rural settings or for a country look. Can be wood or vinyl.
- Wire Mesh Fences: Practical for keeping small animals out of a vegetable garden. Can be combined with wooden posts for a more finished look.
- Decorative Metal Fences: Wrought iron or aluminum fences offer an elegant look and can be a beautiful decorative garden fence.
Fencing for Specific Needs
- Pet-Proof Garden Fence: Look for solid bases, no gaps for paws to slip through, and adequate height to prevent jumping. Chain link or solid vinyl/wood panels work well.
- Fence for Vegetable Garden: Focus on durability and keeping out pests. Chicken wire or hardware cloth at the base of a wooden fence is excellent for deterring burrowing animals. Height is also important to keep out larger animals.
- Privacy Garden Fence: Solid panels, taller designs, or dense hedging are your best options.
Planning Your Garden Fence Installation
Careful planning is key to a successful DIY garden fencing project.
Measuring and Layout
- Determine the Area: Walk the perimeter of your garden. Mark out the exact area you want to fence.
- Measure Accurately: Use a measuring tape to get the total length of the fence line.
- Stake the Corners: Use stakes and string to mark the exact corners of your fence line. Ensure the lines are straight and the corners are square.
- Identify Obstacles: Note any trees, rocks, utility lines, or existing structures that might interfere with the installation. Call 811 before you dig to locate underground utilities.
- Consider Gates: Plan where you’ll need gates for access and how wide they should be.
Local Regulations and Permits
Before you start digging, it’s crucial to check local zoning laws and homeowner association (HOA) rules. Some areas have restrictions on fence height, style, or even the materials you can use. You might need a permit for your garden fence installation.
Step-by-Step DIY Garden Fencing Guide
This section outlines the general process for installing a common type of fence, such as a wooden post and panel fence.
1. Gathering Your Tools and Materials
Ensure you have everything you need before you begin.
Essential Tools
- Measuring tape
- Stakes and string
- Post hole digger or shovel
- Level (post level and standard level)
- Drill and bits
- Saw (circular or hand saw)
- Hammer or screw gun
- Wheelbarrow (for concrete and gravel)
- Gloves and safety glasses
- Safety boots
Materials Checklist
- Fence posts (wood, metal, or vinyl)
- Fencing panels or boards
- Gravel (for drainage)
- Concrete mix (for post stability)
- Post caps (optional)
- Screws or nails
- Gate hardware (hinges, latch)
- String line
- Paint or stain (if using wood)
2. Installing Fence Posts
This is the most critical part of your garden fence installation. Posts provide the structure and support.
Setting Posts
- Mark Post Locations: Space your posts according to the width of your fence panels or your desired spacing (typically 6-8 feet apart). Mark the center of each post location.
- Dig Post Holes: Holes should be about 2-3 feet deep and 3 times the width of your post. The depth ensures stability, especially in areas with frost.
- Add Gravel: Place a few inches of gravel at the bottom of each hole for drainage. This prevents water from pooling around the post base, which can lead to rot.
- Position Posts: Place a post in the center of each hole. Use a post level to ensure it is perfectly vertical (plumb) in both directions.
- Brace Posts: Use temporary wooden braces to hold the posts in place while the concrete sets. Make sure the tops of the posts are at the desired height, using your string line as a guide.
- Mix and Pour Concrete: Mix concrete according to the manufacturer’s instructions. Pour it into the hole around the post, filling it to a few inches below the ground surface. Slope the top of the concrete away from the post to shed water.
- Allow Concrete to Cure: Let the concrete cure completely, which usually takes 24-48 hours, before attaching any fencing.
3. Attaching Fencing Panels or Boards
Once your posts are secure, you can start attaching the fencing itself.
Attaching Panels
- Measure and Cut: If using pre-made panels, measure the distance between your posts. Cut panels to size if necessary.
- Position Panels: Place the first panel between two posts. Use a level to ensure it’s straight.
- Secure Panels: Attach the panels to the posts using exterior-grade screws or nails. For wooden fences, use screws designed for outdoor use to prevent rust.
- Continue Along the Line: Work your way along the fence line, attaching each panel. Ensure each piece is level and aligned with the previous one.
Attaching Individual Boards (for Picket or Board Fences)
- Mark Board Positions: Use a level and measuring tape to mark where each board will attach to the posts.
- Nail or Screw Boards: Attach the boards one by one, ensuring they are plumb and evenly spaced.
- Install Top and Bottom Rails: For some fence styles, you’ll attach horizontal rails to the posts first, then attach the boards or panels to these rails.
4. Installing a Garden Gate
A gate adds functionality and ease of access.
Gate Installation Steps
- Frame the Gate: Construct or purchase a gate frame. Ensure it is the correct size for the opening you left.
- Attach Hinges: Mount hinges to the gate and the adjacent fence post.
- Hang the Gate: Lift the gate into place and attach it to the hinges on the post.
- Add Latch: Install a latch mechanism on the gate and the opposite post.
- Test the Gate: Open and close the gate to ensure it swings freely and latches securely. Adjust hinges if necessary.
5. Finishing Touches
- Post Caps: Add decorative or protective caps to the tops of your posts.
- Painting or Staining: If you used wood, paint or stain it to protect it from the elements and enhance its appearance. Choose exterior-grade products.
- Clean Up: Remove any excess concrete, soil, and debris from the work area.
Cost Considerations for Garden Fencing
The garden fence cost can vary significantly. Here’s a breakdown of factors influencing the price:
Factors Affecting Garden Fence Cost
- Material Choice: As discussed, vinyl and ornamental metal tend to be more expensive than wood or chain link.
- Fence Height and Length: A taller or longer fence will naturally cost more due to increased material and labor.
- Style and Complexity: Intricate designs or specialized features can increase costs.
- Labor Costs: If you hire professionals for garden fence installation, labor will be a significant portion of the garden fence cost. DIY saves on labor but requires investment in tools and your time.
- Site Preparation: If your site requires extensive clearing, leveling, or difficult digging, this can add to the overall garden fence cost.
Estimated Garden Fence Costs (DIY vs. Professional)
| Fence Type | DIY Cost (per linear foot) | Professional Installation Cost (per linear foot) | Notes |
|---|---|---|---|
| Chain Link | $5 – $15 | $10 – $25 | Affordable, good for containment. |
| Wood (Pine/Spruce) | $10 – $20 | $15 – $35 | Needs regular maintenance. |
| Wood (Cedar/Redwood) | $15 – $30 | $25 – $50 | Naturally durable, higher cost. |
| Vinyl | $20 – $40 | $35 – $60 | Low maintenance, good durability. |
| Ornamental Metal | $30 – $70+ | $50 – $100+ | Elegant, excellent for decorative purposes, highest upfront cost. |
Note: These are estimates and can vary based on location, specific product quality, and market conditions.
Maintaining Your Garden Fence
Proper maintenance will extend the life of your fence and keep it looking good.
Wood Fences
- Cleaning: Wash with a mild soap and water solution.
- Sealing/Staining: Reapply sealant or stain every 1-3 years, depending on the climate and product used. This protects against UV rays and moisture.
- Inspect for Damage: Regularly check for loose boards, rot, or insect infestation. Replace damaged sections promptly.
Vinyl Fences
- Cleaning: Usually only requires occasional washing with soap and water.
- Inspection: Check for cracks or warping, though this is rare with quality vinyl.
Metal Fences
- Cleaning: Wash with soap and water.
- Rust Treatment: For steel fences, address any rust spots immediately by sanding and repainting.
Frequently Asked Questions about Garden Fencing
Q1: What is the most cost-effective garden fence?
Chain link fences are typically the most cost-effective for basic containment. For a more attractive and still affordable option, consider basic wooden picket fences or treated pine.
Q2: How tall should a garden fence be to keep out rabbits?
A fence around 18-24 inches high is usually sufficient to deter rabbits. Ensure there are no gaps at the bottom, and consider burying the wire mesh a few inches underground to prevent them from digging under.
Q3: Can I use my existing fence posts for a new garden fence?
If your existing posts are still sound, plumb, and in good condition, you might be able to reuse them. However, if they are rotten, leaning, or damaged, it’s best to replace them for a sturdy new installation.
Q4: What’s the best fence for privacy?
For maximum privacy, a solid panel fence made of wood, vinyl, or composite materials is ideal. Fences that are 6 feet or taller offer the most privacy.
Q5: How do I ensure my fence is straight?
Using a string line stretched tightly between your corner posts is crucial. This acts as a visual guide for setting all intermediate posts and attaching your fencing materials. Always use a level on individual posts and panels.
Q6: Do I need a permit for a garden fence?
It varies by location. Always check with your local municipality or city hall. Many areas require permits for fences over a certain height (often 6 feet).
Q7: What is the lifespan of different fence materials?
- Wood (untreated): 5-10 years
- Wood (treated or rot-resistant like cedar/redwood): 15-25 years
- Vinyl: 20-50 years
- Chain Link: 15-30 years (depending on coating)
- Ornamental Metal: 20-50+ years
By following these steps and considering the various options available, you can successfully fence your garden, enhancing its beauty, security, and functionality.