
A yard hydrant, also known as a frost-proof hydrant or post hydrant, is a crucial component of outdoor water access. Its primary function is to provide a readily available water source for irrigation, livestock, and other outdoor needs while preventing freezing.
Yard hydrants are designed to be buried below the frost line, typically 4 to 6 feet deep, ensuring that the water supply remains unfrozen during winter months. This depth is key to the frost-proof hydrant mechanism.
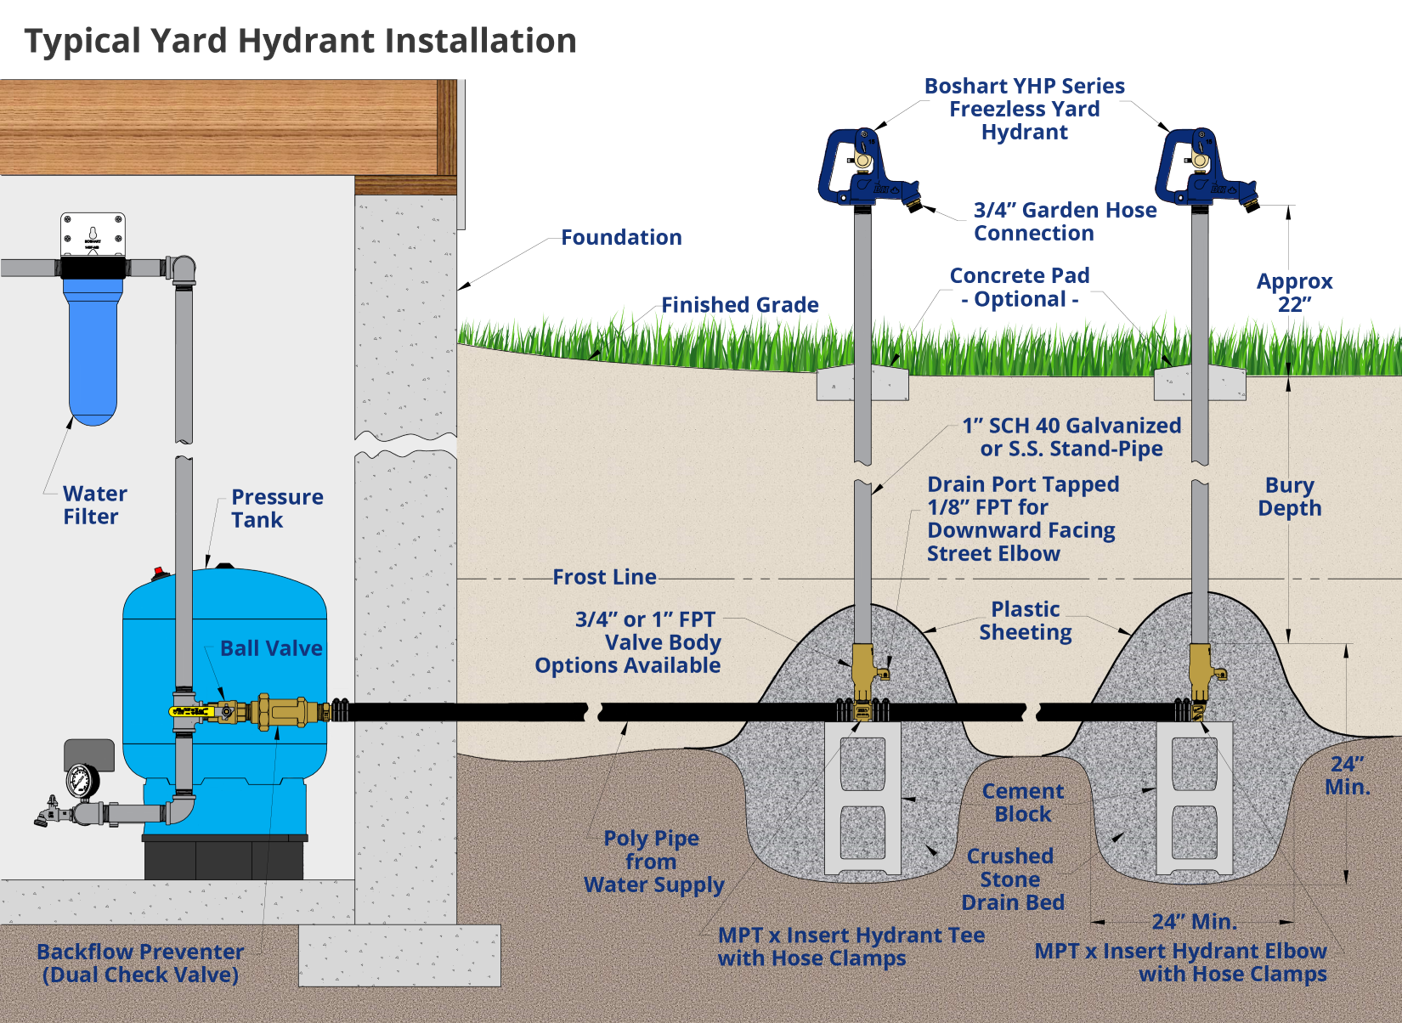
Image Source: blog.boshart.com
Deciphering the Yard Hydrant Operation
The yard hydrant operation is a marvel of simple yet effective engineering. At its core, it’s a valve system connected to the main water supply hydrant. Unlike a standard spigot, a yard hydrant has a unique design that keeps the water below ground.
Here’s a breakdown of how it works:
- The Valve Assembly: The heart of the yard hydrant is its yard hydrant valve assembly. This is located at the bottom of the unit, deep below the frost line. When you lift the handle, you are actually raising a rod that opens this valve.
- The Water Source: The hydrant is connected to your home’s main water supply. This water source hydrant provides the pressurized water to the yard hydrant.
- The Drainage Mechanism: As you close the handle, the valve at the bottom shuts off the water supply. Simultaneously, a small drain hole opens just above the main valve. This allows any water remaining in the pipe above the main valve to drain out into the surrounding gravel or soil. This is the critical frost-proof hydrant mechanism that prevents the pipe from freezing and bursting.
- The Pipe: A sturdy pipe, often made of cast iron or galvanized steel, extends from the main water supply up to the handle. This pipe carries the water to the spout when the valve is open.
Components of a Subsurface Hydrant System
A subsurface hydrant system comprises several key components that work in harmony to deliver water reliably. Understanding these parts helps in grasping the overall post hydrant function.
- The Hydrant Body: This is the visible part of the hydrant, including the spout and the handle. It’s designed to be robust and weather-resistant.
- The Valve Seat and Washer: Located at the bottom of the hydrant, these are responsible for creating a watertight seal when the hydrant is closed. The washer, often made of rubber, is a replaceable part that wears out over time.
- The Operating Rod: This long rod connects the handle at the top to the valve at the bottom. Lifting the handle pushes the rod up, opening the valve.
- The Drain Hole: As mentioned, this small opening is vital for the frost-proof operation. It allows water to escape the upper portion of the pipe when the hydrant is turned off.
- The Packing Nut: This nut compresses packing material around the operating rod to prevent leaks at the top of the hydrant where the rod enters the body.
- The Spout: This is where the water emerges when the hydrant is in use.
How to Use a Yard Hydrant
How to use a yard hydrant is straightforward once you understand its mechanics.
-
Turning On the Water:
- Locate the handle on top of the hydrant.
- Slowly lift the handle upwards. You will feel resistance as you open the main valve deep underground.
- Continue lifting until water begins to flow from the spout. The amount of water flow is generally controlled by how far you lift the handle. Some hydrants have a fully open position.
-
Turning Off the Water:
- Firmly push the handle downwards.
- Continue pushing until the handle is in the fully closed position. You will feel the valve seal shut.
- Crucially, the water above the valve will drain out. You might hear a gurgling sound as this happens. This is normal and essential for its frost-proof nature.
Important Considerations:
- Don’t Overtighten: While you need to push the handle down firmly to shut off the water, avoid excessive force. This can damage the valve seat or washer.
- Check for Leaks: After closing the hydrant, ensure no water is dripping from the spout. A persistent drip indicates a worn washer or a problem with the valve seat.
The Frost-Proof Hydrant Mechanism: Keeping Water Flowing in Winter
The frost-proof hydrant mechanism is the defining feature of these outdoor water sources. The primary goal is to ensure that the water in the hydrant’s pipe doesn’t freeze and cause damage.
Here’s how it achieves this:
- Below Frost Line Placement: The entire valve assembly, the most critical part, is buried below the local frost line. This means the deepest point where the temperature can reliably be expected to drop below freezing is avoided.
- Automatic Drainage: When the hydrant handle is turned off, the valve at the bottom closes. Simultaneously, a small port or hole opens above the main valve. This allows any water trapped in the pipe between the main valve and the spout to drain out into the surrounding soil or a dedicated drainage pit.
- Air Intake: As the water drains, air enters the pipe from the spout, preventing a vacuum and allowing the water to flow out freely.
This dual action – closing the water supply and then draining the upper pipe – ensures that no water remains in the vulnerable sections of the hydrant when temperatures drop.
The Post Hydrant Function: More Than Just Water
The post hydrant function extends beyond simply providing water. It’s about convenient, year-round access to a vital resource.
- Agricultural and Livestock: Essential for watering animals, filling troughs, and general farm use.
- Gardening and Landscaping: Provides easy access for watering gardens, lawns, and washing equipment.
- Car Washing and Cleaning: Convenient for washing cars, patios, and outdoor furniture.
- Emergency Water Access: In some areas, they can serve as a backup water source in emergencies.
Connecting to the Main Water Supply
The connection of a yard hydrant to the main water supply hydrant is a critical aspect of its outdoor hydrant installation.
Outdoor Hydrant Installation: A Step-by-Step Overview
Proper outdoor hydrant installation is essential for the long-term performance and frost-proofing of your yard hydrant. While it can be a DIY project, professional installation is often recommended, especially if you’re not familiar with plumbing.
Here’s a general outline of the process:
- Locate the Water Line: Identify the nearest underground water line from your main supply.
- Dig the Trench: Dig a trench from the water line to the desired location for the yard hydrant. The trench depth must be below the local frost line (typically 4-6 feet). The trench should also slope slightly towards the hydrant to aid drainage.
- Tap into the Main Line:
- Turn off the water supply to your home.
- Using a specialized tapping saddle and corporation stop (a type of valve), create a connection to the main water line. This is a crucial step that requires precision to avoid leaks.
- Install the Hydrant Body:
- Assemble the hydrant. This usually involves connecting the operating rod and valve to the hydrant body.
- Place the hydrant body into the trench.
- Connect the supply pipe from the tapping saddle to the bottom of the hydrant body. Ensure all connections are secure and watertight.
- Create a Drainage Area:
- At the base of the hydrant, in the trench, create a drainage pit. This can be done by filling the bottom of the trench around the hydrant base with several inches of gravel. This provides a space for the drained water to collect and dissipate.
- Backfill the Trench:
- Carefully backfill the trench around the hydrant body, ensuring the hydrant is plumb (vertical) and the handle is at a convenient height. Use soil, sand, or gravel as appropriate.
- Test the Hydrant:
- Once installed, turn the water supply back on slowly.
- Operate the hydrant handle to ensure water flows correctly and that it shuts off completely. Check for any leaks.
- Operate the shut-off valve at the main line connection to test the hydrant’s ability to drain.
Materials You’ll Likely Need:
- Yard hydrant kit (including body, handle, rod, valve assembly)
- Tapping saddle and corporation stop
- Connecting pipe (e.g., PEX, copper, galvanized steel)
- Pipe fittings and adapters
- Teflon tape or pipe sealant
- Gravel for drainage pit
- Shovel and trenching tools
- Pipe wrenches
Yard Hydrant Maintenance: Ensuring Longevity
Yard hydrant maintenance is key to its reliable operation and longevity, especially protecting its frost-proof capabilities. Regular checks can prevent costly repairs.
Routine Maintenance Tasks
- Check for Leaks: After closing the hydrant, always check the spout for drips. A small drip can indicate a worn washer or a damaged valve seat.
- Operate Regularly: Even in seasons when you don’t need water, operate the hydrant a few times. This keeps the moving parts lubricated and prevents them from seizing up.
- Inspect the Handle and Rod: Ensure the handle moves smoothly and the rod is not bent or damaged.
- Check Packing Nut: If you notice water leaking around the operating rod at the top of the hydrant, the packing nut might need tightening. Do this gently, as overtightening can make the handle stiff. If tightening doesn’t stop the leak, the packing material may need replacement.
Seasonal Maintenance
- Spring: After the last freeze, operate the hydrant to ensure it’s working correctly. Check for any damage that might have occurred over winter.
- Fall: Before the first hard freeze, ensure the hydrant is functioning properly and draining correctly when shut off. If you suspect an issue with the drainage, consider draining it manually if possible or seek professional assistance.
Common Issues and Troubleshooting
| Problem | Possible Cause | Solution |
|---|---|---|
| No water flow | Main water supply is off. | Check your home’s main water shut-off valve. |
| Valve at the bottom is stuck closed. | Try operating the handle firmly. If still stuck, professional help may be needed. | |
| Clogged intake at the bottom. | May require digging up and cleaning the intake. | |
| Water leaks from the spout | Worn rubber washer on the valve. | Replace the rubber washer. This involves shutting off water and disassembling the hydrant’s lower section. |
| Damaged valve seat. | The valve seat may need resurfacing or replacement. | |
| Water leaks around the rod | Loose packing nut. | Tighten the packing nut slightly. |
| Worn packing material. | Replace the packing material. | |
| Hydrant doesn’t drain | Drain hole is blocked. | Clear the drain hole with a thin wire or rod. |
| Hydrant pipe is not sloped correctly. | May require professional adjustment during installation or a deeper excavation. | |
| Water table is too high. | The drainage area might be insufficient. |
Yard Hydrant Valve Assembly: The Core Mechanism
The yard hydrant valve assembly is the critical part that controls water flow and ensures proper drainage. It’s typically located at the very bottom of the hydrant, buried below the frost line.
Key elements of the valve assembly include:
- The Valve Body: The housing for the valve mechanism.
- The Valve Seat: A precisely machined surface that the valve washer presses against to create a seal.
- The Valve Washer: A durable rubber or synthetic disc that compresses against the valve seat to stop water flow. This is a wear item.
- The Operating Stem/Rod Connector: The part of the valve that connects to the long operating rod, allowing it to be lifted and lowered.
- The Drain Port: A small opening or channel that aligns with the drain hole in the hydrant body when the valve is in the closed position, allowing water to escape.
When you lift the handle, the operating rod pushes up on the valve stem, lifting the valve washer away from the valve seat, allowing water to flow. When you lower the handle, the operating rod pulls the valve down, seating the washer against the valve seat and stopping the main flow. As the valve closes, the alignment changes, opening the drain port to allow any remaining water in the upper pipe to escape.
Fathoming the Subsurface Hydrant System
A subsurface hydrant system is designed with a crucial aspect in mind: keeping the operational parts out of the freezing zone. This is why the main valve and its associated components are situated deep within the earth.
Advantages of this system:
- Frost Protection: The primary benefit, preventing burst pipes due to freezing.
- Durability: By placing the most vulnerable parts underground, they are protected from surface damage, vandalism, and extreme weather.
- Aesthetics: The visible part of the hydrant is minimal, often just the spout and handle, contributing to a cleaner appearance.
Frequently Asked Questions About Yard Hydrants
Q1: What is the main purpose of a yard hydrant?
A1: The main purpose of a yard hydrant is to provide a convenient and reliable outdoor water source that is protected from freezing temperatures.
Q2: Can I install a yard hydrant myself?
A2: Yes, with the right tools, materials, and knowledge of plumbing and local building codes, you can install a yard hydrant yourself. However, if you are unsure about any part of the process, especially tapping into the main water line, professional installation is highly recommended.
Q3: How deep does a yard hydrant need to be buried?
A3: A yard hydrant’s valve assembly must be buried below the local frost line. This depth varies by region but is typically between 4 to 6 feet.
Q4: What happens to the water left in the pipe when I turn off a yard hydrant?
A4: When you turn off a yard hydrant, the valve at the bottom closes, and a small drain hole opens just above it. This allows any water remaining in the pipe between the main valve and the spout to drain out into the surrounding soil or a drainage pit. This is the key to its frost-proof operation.
Q5: How do I know if my yard hydrant is working correctly?
A5: After turning off the hydrant, check the spout for any drips. A consistent drip indicates a problem, likely a worn washer or a damaged valve seat. Also, listen for the gurgling sound of water draining, which confirms the frost-proof mechanism is functioning.
Q6: What if my yard hydrant freezes?
A6: If your yard hydrant freezes, it’s likely that the drainage mechanism failed or the hydrant wasn’t installed deep enough below the frost line. This can cause the pipe to burst, leading to significant water damage and loss of water supply. You will need to shut off the main water supply to that line and likely excavate to repair or replace the hydrant.
Q7: How do I maintain a yard hydrant?
A7: Regular maintenance includes checking for leaks at the spout, operating the hydrant periodically, and inspecting the handle and rod. In the fall, ensure the hydrant is draining properly before freezing temperatures arrive.
Q8: What is the difference between a yard hydrant and a standard outdoor faucet?
A8: A standard outdoor faucet (spigot or hose bib) has its valve located at the faucet itself, often just behind the handle. If water is left in the pipe above the valve during freezing temperatures, it can freeze and burst. A yard hydrant has its valve deep underground, below the frost line, and includes an automatic drainage system to prevent freezing.