
Image Source: minnesotaequipment.com
How Often To Replace Lawn Mower Blades: Best Practices
How often should I replace my lawn mower blades? Generally, you should replace your lawn mower blades every 25 to 50 hours of use, or at least once a year, depending on your mowing conditions and frequency. This guideline ensures optimal mowing performance and the health of your lawn.
Keeping your lawn mower in top condition is key to a beautiful yard. One of the most crucial but often overlooked aspects of lawn mower maintenance schedule is the state of your blades. Worn-out or damaged blades don’t just make mowing harder; they can actively harm your grass, leading to a less healthy and attractive lawn. This in-depth guide will walk you through everything you need to know about lawn mower blade lifespan, when to consider replacing mower blades, and how to keep them in peak condition.
The Importance of Sharp Blades
Why is lawn mower blade sharpness so important? Think of your mower blade like a pair of scissors. A sharp blade makes a clean cut, slicing through grass blades cleanly. A dull blade, on the other hand, tears or rips the grass. This tearing action is much more damaging to the grass, leaving ragged edges that are more susceptible to disease, pests, and browning.
Dull mower blades can lead to several problems:
- Uneven Mowing: You might notice “streaks” or patches of uncut grass.
- Brown Tips: The grass blades appear chewed rather than cleanly cut, turning brown at the tips.
- Increased Stress on the Mower: The engine has to work harder to push dull blades through the grass, leading to premature wear and tear on the mower itself.
- Slower Mowing: You’ll find yourself having to push or drive the mower more slowly to achieve a decent cut.
- Grass Diseases: The frayed edges of grass left by dull blades provide entry points for fungi and bacteria.
Deciphering When to Sharpen or Replace Blades
Knowing when to sharpen mower blades is a skill that develops with experience and observation. While hours of use are a good benchmark, several visual and performance cues will tell you it’s time to take action.
Signs of Dull Mower Blades
Pay attention to how your lawn looks after mowing. These are the tell-tale signs that your blades need attention:
- Ragged Grass Tips: This is the most common indicator. After mowing, inspect the tips of your grass blades. If they look torn, frayed, or chewed, your blades are dull.
- Yellowing or Browning Lawn: If your entire lawn starts to look yellowish or develops brown tips shortly after mowing, it’s a strong sign that the blades are damaging the grass rather than cutting it cleanly.
- Uneven Cutting: Areas of the lawn are cut shorter than others, or you see distinct lines of uncut grass.
- Mower Struggles: You notice the mower engine sounds strained or is bogging down, especially in thicker grass. This means the dull blades are creating too much resistance.
- Visible Blade Wear: If you remove the blades for inspection, you might see that the cutting edge has become rounded, chipped, or significantly thinned.
Factors Affecting Lawn Mower Blade Lifespan
The lawn mower blade lifespan isn’t fixed; it varies based on several factors:
- Type of Grass: Tougher grasses, like some types of fescue, can wear down blades faster than softer grasses like certain Bermuda varieties.
- Mowing Conditions:
- Rocky or Sandy Soil: Mowing over sand or small stones can quickly dull or even chip blades.
- Weeds and Tall Grass: Mowing through thick, tall grass or dense weeds puts more strain on the blades.
- Infrequent Mowing: Letting the grass get too long between mows means the blades are cutting more material at once, leading to faster wear.
- Blade Material and Quality: Higher-quality steel and better heat treatment can result in blades that hold their edge longer.
- Frequency of Mowing: The more you mow, the faster the blades will wear.
How Often to Replace Lawn Mower Blades: A Practical Guide
As a general rule, most homeowners should aim to inspect their lawn mower blades at least twice a mowing season and perform sharpening lawn mower blades or replacing mower blades as needed. However, here’s a more detailed breakdown:
-
For the Average Homeowner (Mowing 1-2 times per week during the growing season):
- Inspection: Check blades every 10-15 mowing hours or at the beginning and middle of the primary mowing season.
- Sharpening: Sharpen blades when you notice signs of dull mower blades. This might be every 25-50 hours of use.
- Replacement: If blades are significantly nicked, bent, or worn down after sharpening, consider replacing mower blades. This might be every 1-2 years for a typical homeowner.
-
For Heavy Users or Challenging Conditions (Mowing frequently, in rocky areas, or with tough grasses):
- Inspection: Inspect blades every 5-10 mowing hours.
- Sharpening: You might need to sharpen blades more frequently, potentially every 15-25 hours of use.
- Replacement: You may need to consider replacing mower blades annually or even more often if damage is significant.
Table 1: Lawn Mower Blade Maintenance Frequency Guidelines
| User Type/Condition | Inspection Frequency (Hours) | Sharpening Frequency (Hours) | Replacement Frequency (Years) |
|---|---|---|---|
| Average Homeowner | 10-15 | 25-50 | 1-2 |
| Heavy User/Challenging Conditions | 5-10 | 15-25 | Annually or sooner |
| Occasional Mowing/Ideal Conditions | 15-20 | 30-60 | 2+ |
Sharpening vs. Replacing: Making the Right Choice
You’ll often face the decision: should you sharpen the existing blades or buy new ones?
When to Sharpen Lawn Mower Blades
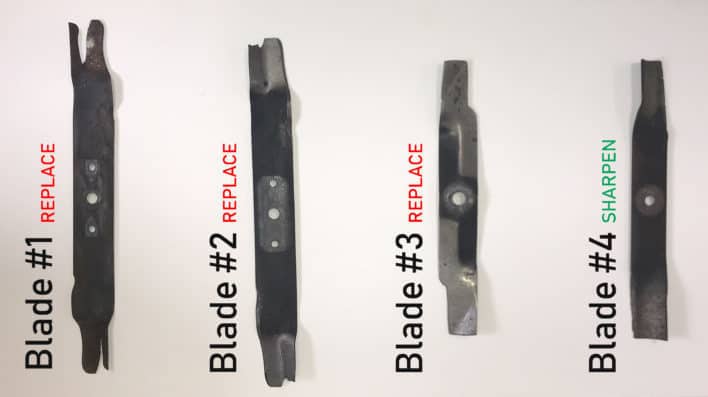
Sharpening is a viable option when the blades are:
- Slightly Dull: The cutting edge is rounded but not significantly damaged.
- Minor Nicks: Small chips or nicks that can be filed away without removing too much metal.
- Still Sufficiently Thick: The blade has enough material left to maintain its structural integrity after sharpening.
Sharpening lawn mower blades is a cost-effective way to maintain good mowing performance.
When to Consider Replacing Mower Blades
It’s time for new blades when:
- Significant Damage: Blades are bent, warped, cracked, or have large chunks missing.
- Excessive Thinning: After multiple sharpenings, the blade is noticeably thinner than a new one. A good rule of thumb is that if you can see through the blade easily when holding it up to a light, it’s time to replace it.
- Persistent Dullness: Even after sharpening, the blades don’t seem to hold an edge or the cutting quality doesn’t improve.
- Safety Concerns: Bent or cracked blades can break off during operation, posing a serious safety hazard.
Replacing mower blades is often the safer and more efficient choice when blades are heavily damaged.
The Process of Sharpening Lawn Mower Blades
DIY lawn mower blade replacement and sharpening are achievable for most homeowners. However, sharpening lawn mower blades requires specific tools and techniques.
Tools You’ll Need for Sharpening:
- Work Gloves: For safety.
- Safety Glasses: Essential to protect your eyes.
- Socket Wrench or Wrench Set: To remove the blade bolts.
- Blade Balancing Tool: Crucial for ensuring even weight distribution.
- Metal File or Grinding Wheel (Bench Grinder or Angle Grinder): For sharpening.
- Wire Brush: To clean the blades.
Steps for Sharpening:
- Disconnect Spark Plug: ALWAYS disconnect the spark plug wire before working on the mower to prevent accidental starting.
- Remove the Blade: Tilt the mower or use a block of wood to stabilize the deck. Use a wrench to loosen and remove the bolt holding the blade. Note the blade’s orientation.
- Clean the Blade: Use a wire brush to remove dirt, grass, and rust from the blade.
- Sharpen the Blade:
- Filing: Secure the blade in a vise. Use a metal file to sharpen the cutting edge at the same angle as the original bevel. File only in one direction, away from the cutting edge.
- Grinding: If using a grinder, be careful not to overheat the metal, as this can weaken it. Use a light touch and move the blade frequently. Aim for the original angle.
- Balance the Blade: This is a critical step. An unbalanced blade will vibrate excessively, putting stress on the mower’s engine and bearings, and can lead to premature failure. Use a blade balancing tool. If one side is heavier, file a small amount of metal from the heavy side. Repeat until the blade balances evenly.
- Reinstall the Blade: Reattach the blade in the correct orientation (ensure the cutting edge faces the ground). Tighten the bolt securely.
- Reconnect Spark Plug: Once the blade is reinstalled, reconnect the spark plug wire.
The Procedure for DIY Lawn Mower Blade Replacement
DIY lawn mower blade replacement is a straightforward process that can save you time and money.
Tools You’ll Need for Replacement:
- Work Gloves: For safety.
- Safety Glasses: Essential eye protection.
- Socket Wrench or Wrench Set: To remove and install blade bolts.
- New Mower Blades: Ensure they are the correct type and size for your mower model.
- Block of Wood: To stabilize the deck.
- Torque Wrench (Recommended): To ensure bolts are tightened to the manufacturer’s specifications.
Steps for Replacement:
- Disconnect Spark Plug: As with sharpening, disconnect the spark plug wire first.
- Remove Old Blade: Tilt the mower or stabilize the deck. Loosen and remove the bolt(s) holding the old blade.
- Inspect Blade Mount: Clean any debris from the spindle and the mounting area.
- Install New Blade: Position the new blade with the cutting edge facing downwards. Ensure it’s correctly oriented according to your mower’s manual.
- Tighten Blade Bolt: Install the bolt and tighten it securely. If you have a torque wrench, use it to tighten the bolt to the manufacturer’s specified torque. Over-tightening can damage the spindle; under-tightening is a serious safety risk.
- Reconnect Spark Plug: Reconnect the spark plug wire.
Selecting the Right Replacement Blades
When replacing mower blades, it’s vital to choose blades designed specifically for your mower model. Using the wrong blades can affect mowing performance, potentially damage your mower, or even create a safety hazard. Always consult your owner’s manual or the manufacturer’s website for the correct part numbers and specifications.
Maximizing Your Lawn Mower Blade Lifespan
Beyond regular sharpening and timely replacement, a few practices can help extend the life of your mower blades:
- Avoid Mowing Over Obstacles: Stones, branches, and debris are the enemies of sharp blades. Clear your lawn of any potential hazards before mowing.
- Mow When Dry: Mowing wet grass can lead to clumping, which puts more strain on the blades. It can also cause grass clippings to stick to the blades and deck, creating imbalance and promoting rust.
- Regular Cleaning: After each mowing session, use a hose or compressed air to remove grass clippings from the blades and the underside of the deck. This prevents buildup that can lead to imbalance and corrosion.
- Proper Storage: Store your mower in a dry place, especially during the off-season. This helps prevent rust and corrosion on the blades.
- Consider Blade Types: For particularly demanding conditions, you might consider mulching blades, which are designed to cut grass into finer pieces and can sometimes be more durable.
Frequently Asked Questions (FAQ)
-
Q1: How do I know if my lawn mower blades are truly dull?
A: Look for ragged, torn grass tips after mowing, a yellowing or browning of the lawn, and notice if your mower seems to struggle or cut unevenly. These are clear indicators of dull mower blades. -
Q2: Can I sharpen lawn mower blades with a regular file?
A: Yes, you can use a metal file for sharpening lawn mower blades. It’s a slower process than using a grinder, but it’s effective and easier to control for beginners. Ensure you maintain the correct angle. -
Q3: Is blade balancing really necessary?
A: Absolutely. An unbalanced blade causes vibrations that can damage your mower’s engine and bearings, reducing its lawn mower blade lifespan and potentially leading to costly repairs. -
Q4: How often should I check my mower’s blade for damage?
A: It’s a good practice to inspect your blades at least once at the beginning and middle of your mowing season, and anytime you suspect you might have hit something hard. This is part of a good lawn mower maintenance schedule. -
Q5: What’s the difference between mulching blades and standard blades?
A: Mulching blades have a more curved or “lifted” design to keep grass clippings circulating under the deck longer, allowing them to be cut multiple times. Standard blades are designed for side discharge or bagging. The design can affect their mowing performance and durability. -
Q6: Can I do DIY lawn mower blade replacement myself?
A: Yes, DIY lawn mower blade replacement is a common and manageable task for most homeowners. Just ensure you disconnect the spark plug, use appropriate safety gear, and tighten the bolts correctly. -
Q7: Will sharpening my blades make my mower cut faster?
A: While not directly increasing speed, sharp blades allow your mower to cut efficiently without bogging down, which can make the mowing process feel faster and smoother, thus improving overall mowing performance.
By adhering to these best practices for lawn mower blade lifespan, maintenance, and timely replacing mower blades, you’ll not only ensure a healthier, more beautiful lawn but also extend the life of your lawn mower itself. Regular attention to your blades is a small effort that yields significant rewards.